Saturday, October 29, 2011

Basic Biscotti

As graduate students, we really like our caffeinated beverages.  And by really like, I mean probably couldn't live without.  In fact, I no longer dilute my magical coffee with things like sugar or cream.  Much to The Sleepy One's amusement, I prefer my coffee 'straight up'.  And occasionally Irish.

But sometimes I like a little treat/sustenance with my tea or coffee.  Enter the biscotti.  Basically a crisp cookie that cafes will try to sell for $2 a pop.  Perfect for dunking, but not perfect for my pocketbook.  So here is a basic recipe for biscotti that you can flavor as you choose.  This batch I made with some homemade orange extract, the recipe for which you can find here.

To make the biscotti, you will need:

1/2 cup vegetable oil
1 cup sugar
3 eggs
1 tablespoon flavoring (vanilla, orange, almond, or anise extract)
3 cups all-purpose flour
1 tablespoon baking powder


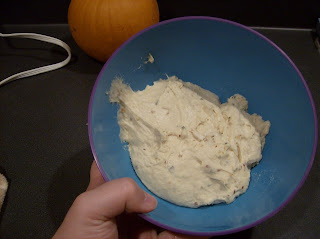
Beat oil, sugar, eggs, and flavoring in a bowl until blended.  Slowly stir in flour and baking powder until a dough is formed.  Divide in half.  Form each half into roll or log and roll as long as your cookie sheet.  Place each roll on a greased or parchment covered cookie sheet. Press down the top of each roll until they are ½ inch think and flat on top.


Bake at 375 F for 25 minutes.  Remove from oven; allow to cool until cool enough to handle.  Remove from cookie sheet and cut each log, at an angle, into ½ inch slices.  


Place the slices  cut side down back on the baking sheet.  Bake for 5 minutes; flip the slices over and bake for another 5 minutes.  Remove from oven and allow to cool.


Store in an air-tight container.  Enjoy with a hot cup of coffee or tea during a study break.

- The Pink One

Homemade Orange Extract

Tailing on the last post, here is a brief recipe for orange extract.  Just like vanilla extract, orange extract can be quite expensive.  But it can be a wonderful flavor addition to many baked goods, especially those that include other fruit.  Or chocolate.

So with the holiday baking season fast approaching, I decided to get a batch started.  Plus we still have to kill off that bottle of nasty-ass vodka.

You will need:

1 cup vodka
1/4 cup hot water
The zest of 2 oranges
One glass, seal-able jar large enough to hold ingredients.

Wash and sterilize glass jar.  Let dry and set aside.

Wash the oranges well.  Zest the oranges, being sure to not scrape down into the white pith.


  Mix zest and hot water in the glass jar.  Let steep for at least 10 minutes.


Pour in vodka.  Seal with lid and give a good shake.  Extract will be ready for use in one week.

It will kind of look like Tang.  With pulp.  Mmmm.

- The Pink One

Saturday, October 15, 2011

Homemade Vanilla Extract

After The Yellow One made her fabulous vodka pie crust, we found ourselves in possession of a small bottle of vodka.  Now, this typically wouldn't be a problem for three graduate students such as ourselves, except that it was cheapest, grossest vodka we could find.  It has therefore spent the last month taking up space in our freezer.


Yeah.  Go Hawkeyes.

As you might imagine, Yellow and I go through a lot of baking supplies.  And probably the most expensive is vanilla extract.  You can get the cheap, imitation stuff for little more than a dollar.  But your baking suffers for your cheapness.  A decent quality vanilla extract will run you around $5-8 for a 4 oz. bottle.  

What?  Is the secret ingredient gold?

The vodka reminded me a trick I'd read about years ago.  Homemade vanilla extract using vodka and vanilla beans.  I couldn't make it at the time as I wasn't old enough to buy alcohol yet and just forgot about it.

After re-researching the product, I decided to give it go.  Many others seemed satisfied with their results and I look forward to never being without my precious elixir again.

To make the extract you will need:

1 cup vodka, bourbon, or rum
3 vanilla beans
An air-tight glass container large enough to hold both the liquor and beans.

Clean and sterilize the container.  Either run through a dish washer, or hand wash and fill with boiling water.  Allow to cool and dry.  Fill with liquor of choice.

Take the vanilla beans and slice down the middle.  If your container is tall enough, slice the bean leaving about an inch unsliced at the bottom.  If you used a smaller jar like I did, cut bean in half before slicing, again leaving a bit at the bottom unsliced.


Place the sliced vanilla beans in the jar.  Close jar.  Shake vigoursly.  Place in a dark space. 

Give the jar a shake about once every week.  Extract will be ready in two months.


Two months!? But I want it now!

Yep, two months.  But it was be so worth the wait.

Some cool things I've read about the upkeep of the extract.  You can pretty much keep it going by 'feeding' it like you would a sourdough starter (which is a post for another time).  When the jar gets down to about a quarter tank, top off with more liquor and replace one of the beans with a fresh one.

On choosing liquors, vodka, rum, and bourbon were the blog favorites.  Anything that is 80 proof (40% alcohol  works.  I used vodka as it makes plain, old fashioned extract and we had some on hand.  But the rum version would also add a nice flavor to many recipes like banana's foster, buttercream frosting, and anything with chocolate in it.

Lastly, look around for inexpensive vanilla beans.  This might mean looking online.  The cheapest bean that I could find in my city ran just under $3; the most expensive was $11.95.  For a bean.  I found good quality beans here.  They sometimes sell them even cheaper on Amazon.  I ended up only paying $0.65 a bean, though I had to buy a 10 pack.

We will keep you updated on the extract's progress. If all goes well, it should be done just in time for our Christmas Baking Extravaganza!

- The Pink One

Thursday, October 13, 2011

Chili Lime Chicken Pizza

The Yellow One had gone up to the Twin Cities for the weekend.  The Sleepy One and The Lollygagging One had gone back home.  And The Wandering One was, well, wandering.  What were The Olive One and I supposed to do?  Pizza, beer, and movie night.  Obviously.

We are such walking cliches.

So there we were.  Standing hungry and cold in our local grocery store, trying to figure out what the hell to make.  When we came across the sauce aisle.  Oh the sauce aisle!  Inspiration galore!  After a brief discussion on toppings, a fight over the pros and cons of various cheeses, and an awkward glare from a mother of four, we collected our ingredients and headed home.

The first thing we had to make was the pizza dough.  And by we, I mean me.  This recipe is for a thick, 14 inch wide pizza crust.  If you prefer a thinner, smaller crust halve the recipe.


To make the dough you will need:

1 package of active dry yeast (2 ½ tsp.)
1 c. lukewarm water (approx. 110 F)
2 c bread flour (all-purpose will due in a pinch)
2 Tb olive oil
1 tsp salt
2 tsp sugar
1 Tb oregano (optional)
1 Tb red pepper flakes (optional)

In a cup or small bowl mix the yeast and water.  It is important that the water be between 105-115 F for the yeast to activate.  Lower in temperature and there is little or no effect; higher and you kill the yeast.  Let mixture sit for 10 minutes.

In a medium bowl, combine flour, salt, sugar, and optional spices if desired.  Stir in water and oil until well combined.  The dough will be slightly sticky.  Let sit for 30 minutes; cover the bowl with a dish towel.


While the dough is resting, prepare your pizza toppings.  For pizza toppings you will need:

Good Housekeeping's Chili Lime Marinade or something like it
1 large chicken breast
1/2 green pepper
1/4 large yellow or red onion
2 roma tomatoes
1 clove garlic
lime juice
1 1/2 cups mozzarella cheese

Cut up chicken breast into small, bite-sized pieces.  Place in small, greased baking pan and pour enough marinade to cover the pieces.  Let marinate for at least 20 minutes; an hour is ideal.  Once marinated, place in a pre-heated 350 F oven for 10 minutes.  Remove from oven and allow to cool.

Try not to eat it all before putting it on the pizza.

Take the pepper, onion, and tomatoes and cut into small pieces.  Mince the garlic.  Sprinkle veggies with a little bit of lime juice.

Now to make our crust.  Remove dough from bowl and knead lightly.  On a large floured baking pan or stone, roll out the crust until its about 1/2 inch thick.  Place in pre-heated 350 F oven and bake for 7-9 minutes.  Remove from oven and allow to cool slightly.

Once slightly cooled, spread a very thin layer of marinade over the crust.  Sprinkle cheese over the crust and marinade.  Mozzarella works well, but try an Italian or pizza blend of cheeses.  Equally spread chicken, veggies, and garlic over the cheese.  At this point, it should look something like this:

Om nom nom nom....

Place back in the 350 F oven for 12-15 minutes or until desired brownness is achieved.  Serve with Parmesan cheese or with extra marinade on the side.  Wash down with a cold beer.  Enjoy with a good movie.

Suggested dessert:

Because everybody loves Alec Baldwin's Schweddy Balls.

 - The Pink One


Thursday, September 29, 2011

Sundays Are for Travel

At the start of this school year, one of my professors gave us a bit of advice.  Read, work hard, and keep Sundays for travel.  Taking her up on her advice, we began investigating some places to check out in the area.  With fall setting in we decided to hit up a local apple orchard before it got completely picked over.  Or so we thought.

The Olive One, The Yellow One, The Lollygagging One and I headed out one fine Sunday afternoon into the eastern Iowa countryside. After a ten minute drive north, the Garmin requested we turn right.  Onto Dingleberry Road.


This is why you don't let your 15 year-old son name anything. Ever.

Upon arrival we were greeted by a beautiful view of rolling hills filled with apple trees.  And the smell of apple cider donuts.  And screaming children.  After grabbing some apple baskets, we headed off to the area of the orchard we were told would be filled with delicious, juicy apples.  Not so much.  But at least it was away from the screaming children.  And looked like this.


So the actual picking of apples was kind of a bust.  But that didn't stop us from enjoying a fine fall afternoon.

In search of apples.

Olive fakes a photo op.

Pink pretends to pick a sour apple.

After giving up on finding edible apples we headed back to the farmhouse.  There we bought some pre-picked apples so we could at least make some apple-based treats.  We also picked up some apple butter, a caramel apple, and a bag of apple cider donuts.

I don't know how these made it to the morning.

So we took our goodies home and started making apple pie and apple crisp.  And by we I mostly mean Yellow.  She shared the secret to her easy pastry crust here.  But here are some photos of the process.

Stabby stabby! - Yellow

Slicey slicey!

She has too many apples in her pie, if you know what I mean.

Om nom nom nom.

Over all, a wonderful Sunday afternoon away from the books.  Plus, now The Guv'nah smells like Christmas!

- The Pink One

Sunday, September 25, 2011

3.14

Autumn time is apple pie time. I'm a huge fan of making as many things from scratch as possible, but up until recently I was always afraid of trying to make pie crusts - my OCD-like tendency to overmix things into submission didn't seem like a good fit for the light hand that crusts need. However, my mother recently directed me to the secret to perfect pie crusts: vodka! It has to do with the alcohol evaporating out to keep the crust flaky so you don't have to worry about the gluten building up and becoming it tough or something along those lines... Who cares, all I know is BOOZE SCIENCE = PIE MAGIC.

ALAKAZAM!

The biggest drawback is at some point during the process I always inevitably end up tasting some of the dough and wondering why it tastes so awful until I remember there is booze in it. The crust recipe I always follow is here. PRO TIP: the dough comes out extremely tacky and difficult to roll, so I usually roll it out between two pieces of saran wrap so it doesn't stick to my rolling pin (which was always a wine bottle up until recently - The Pink One supplied a real rolling pin and part of me was mildly disappointed). For these pies I added some cinnamon, nutmeg, ground ginger and allspice to the crust as well. The assembled pie (made from apples from a local orchard) is currently in the oven and two of our Bros are on their way to The Guv'nah to bring mulling spices for our cider, eat our food and generally tell us how awesome we are. Happy Sunday!

- The Yellow One

Welcome to The Guv'nah

At some point in every academic's life, there comes a realization that studying is not everything.  Sometimes its after your first grad school fail.  Sometimes it's after your first stress-induced panic attack.  Sometimes is when you realized you don't recognize anyone on Perez Hilton.


He seems like a nice young man...

This creates a need to step back from the textbooks, step out of the stacks of the library, and find something worth while to do that can not be placed on a CV.  As such, we have decided to document our shenanigans* and shindigs in a shared blog. We share a love cooking and good food, Harry Potter, and whiskey. We are three graduate students sharing a house and attending a Big Ten university.

Guess which Big Ten.

Along with our cohorts, we plan on making graduate school as exciting as possible, and you are welcome to follow us as we navigate our programs and earn our degrees.  We hope to share our favorite food and cocktail recipes, our favorite party ideas, and insight into surviving graduate school.

We welcome ideas for recipes, inexpensive activities, and party themes.


- The Pink One


*Edit from The Yellow One - according to teenage rom-coms, we would have WAY more shenanigans if we lied more. We need to start telling people that our fathers know rock stars and we'll be onstage for their next concert, or that we have hot dates to the big dance tomorrow when we really don't!